One may think that gardening is not for the blind. “How will I find the plants, how will I know if the produce is ripe, and what is this bug anyway?” are some common questions that come to mind. While these may be all good questions, they are common to even the sighted gardener. I’d like to take a step back, though, and just focus on getting started. We can explore some solutions to those other questions in the future, but today, we’re just going to look at getting a seedling started.
My name is Moe Carpenter, and I am no master gardener, and yet I have been doing hobby gardening since I was little. It’s definitely something I am always growing and learning about. I hope to share with you some of the wisdom I have learned along the way, and my hopes are that you will at least try to grow something this year.
What You Need…
- A packet of seeds
- Seed starting soil mix
- A container to put the soil and seeds into
- Misty spray bottle
- A light source
- Patients
I’ll explain these items further below for those who want a little more insight. For everyone else, let’s just get started.
- Put your soil mix into your container. Typically, I just use my hand or another cup to get from bag to pot. You should be able to feel how full the container is, and you’ll want to leave a little room for watering, so leave about a fingertip ½ inch from the top.
- Water the soil. You want to make sure the soil has had some time to settle before you start planting in it. Keep the soil damp but not a swamp. After a few days of keeping it moist, then it is time to plant.
- Time for the seeds. You can use a few at a time. Most seeds need to be planted about two times their size. This is pretty simple. You just poke a hole with your finger and push some soil in around it when you’re done. This is one step in which it is vital to read the seed packet. Some seeds cannot be transplanted, which means wherever you start them, they need to stay. Some seeds need to be soaked first before you plant, and usually this is where you will see things like how deep and how long it will need for best germination. Even things like ideal soil temperature may be listed.
- Turn on your light source. I try to keep mine on as much as I can during the non-sleeping hours of the day. I alternate among Blue, yellow, and White LED lighting, but that is simply because my light source offers this option.
- Water as you feel needed. In this small starter containers, they may need a few drops a day. They typically don’t need a lot, and you will learn what the difference of dry vs damp soil feels like.
- Once your seedlings emerge, make sure your light source is never touching the seedling. It will burn it. 2 inches is a good distance between your plant and the light source. Another way to think of this is to make sure there is the width of your hand between the seedling top and the light source.
Starting with the seed packet. You can get seeds just about anywhere. I have seen them at target, dollar stores, garden centers, online, and sometimes they are given away at events. You will get more than you may need, but that just means more chances to try if you don’t succeed the first time. Also, keep in mind that sometimes seeds are duds. It happens even to the best brands, so if you don’t succeed, try again. the seed packet is your best friend. It will have lots of information on it, including a germination expected range. This can take as long as three weeks from when the seeds are first put into the soil and you start the watering and light process.
Oftentimes, you will find seed soil mix included in a seed starting kit, which will also come with containers to start seeds in. These are not my favorite options simply because this mix is often just peat mix, and this dries out far too quickly. I also find it is hard to have it retain water. I prefer something more around a potting mix, which often includes the peat but other soil materials as well. As far as containers go, you can use just about anything, even as simple as a cup. Right now, I am using ones that you can plant right into the ground. (Remember that you do break away the bottom when you move these into the ground or it’s more permanent setting, so the roots can spread more easily.)
Water sources can be just about anything. I have suggested a misting spray bottle, as I know these can be found pretty easily in most stores. Be careful if reusing a spray bottle. Oftentimes, these are for chemical cleaners, and the solutions can get into the plastic and can contaminate the water they later spray out, so it’s best to start with a new bottle. I have also used medicine droppers, a straw, or just flicking from a cup.
Light source may be the most complicated thing. They do sell grow lights in many gardening centers. I do not have one and I have read LED lights that aren’t made for gardening work just as well. I have an Ott Lite for other things, so I use that for my seeds too. It has three brightness settings and three different LED colors. I googled it, and it said blue, white, and yellow light waves all do different things for the seeds, so I like to rotate through mine during the day, but I have no actual idea if that makes any difference.
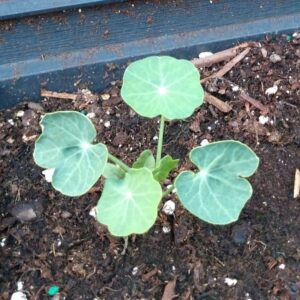
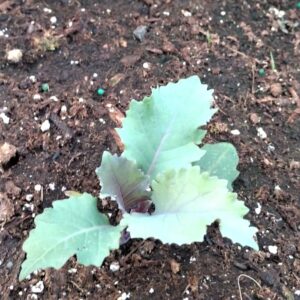
Congrats – you did it! You have a seedling. Now what?
If this is going to be an indoor plant, simply decide on how big it will end up and get a proper sized container in which to transplant it. The process is fairly similar to the starting, accept you’ll need a whole as big as the starting container. Now you’ll just need to figure out where in your home will give it enough sun. I do not usually harvest anything from an indoor plant, but my home does not have good windows for plants. (Well, that and the cats and children.) My plants move outdoors.
For transplanting outside, there is a process called hardening off. This is when you remove the seedling from its happy, consistent environment and start exposing it to the elements. First, you will just set it in the shade or indirect light. Then start moving it out into the sun more and more each day. This is where a greenhouse may come in handy as it will remove the wind factor from your plant. Be careful because your plants will dry out much more quickly once out in the “real world.” Finally, after a few weeks, then you can move your seedling into the ground. Don’t be surprised if it gets a little sick-acting after the move. Plants are like us and don’t like change either. They will recover once they learn there is new soil that has more nutrients for them.
If you noticed, I really didn’t mention any specific assistive or blind tools in this process. That is simply because I don’t really use any myself. Here are a few ideas if you do wish to get more complicated with the process:
Way Around Tags
These tags use NFC to communicate with things like a smartphone app. The great thing about these tags is if they are secured in how they are staked around the plant, they can withstand weather elements. This allows you to have identification of what the plant is and other details you have programed the tag to tell you about the plant. You can fit a lot of text on a WayTag, so it can become a mini diary for that plant if you wish.
Text-to-Speech Apps
I personally use an Android phone, but I know there are other devices and apps out there. I use Google Lens to take pictures of things like the seed packets to read me the text. You can even then take that text and paste it onto your WayTag.
Marking Stakes
Now this is not techie like the other things I have mentioned. Some extra items can be things like toothpicks or popsicle sticks to mark where your seeds are. A fun idea for planting right into the ground or a raised bed is to tie a string around two plant markers and only plant seeds in that line.
Raised Beds
This has been my favorite discovery of all time! We have some raised, table-height beds that live on our deck, and another system of 4×4 beds that are on top of the yard. This way, you always know where the edge of the garden is, and you can protect your plants from some wildlife too.
If you would like more information on gardening, there are countless books, blogs, and videos all over the web. There are also several books on the NLS service that can be obtained from your local library or BARD. They even have one that’s all about unusual containers for your plants. Now, go forth and start growing for yourself!